0:00
Hello and welcome back to my channel where we go beyond the design to build something beautiful
0:10
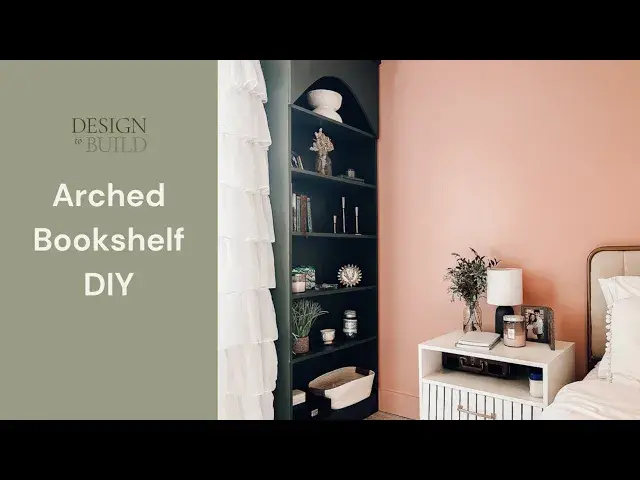
Today I'm showing you the bookcase that I built for my daughter's room
0:15
She's in her almost ready to turn 20. Wanted me to build her a bookcase and I was very intimidated by it because I wanted it to have an arch on the top just for the design of her room
0:28
I felt like an arch would look really good in here. It's a very organic modern type room
0:35
I just felt like that arch would just really stand out. So in building her bookshelf, her arched bookshelf, it's very simple
0:43
I use a couple sheets of plywood, and that is it. I didn't use any other wood besides the plywood
0:51
It was really that simple. The arch simply used a ruler to get my arch
0:55
You can see that when I show that. in the slides coming up, how I did that
1:00
and just made it very, very simple to draw that arch and then to cut it
1:06
For my first time, it wasn't, it's not perfect by any means
1:10
but it's pretty good for my first time drawing and cutting out an arch
1:16
And so I feel like this method of how I did that
1:20
made it really, really easy. The paint color I chose for this was is shade grown by Sherwin Williams I love the contrast of the green with the pink I feel like they complement each other very very well
1:35
They're both very warm colors. They coincide together very nicely. If you enjoy this video, be sure to hit that like button and subscribe for more great content
1:44
First we're going to cut the sides of our bookshelves. Cut two side pieces at 93.5 inches by 10 inches
1:52
Now we're going to cut the shelves. Eight shelves at 26.5 inches by 10 inches
1:58
Using a Craig jig, drill 3 quarter inch pocket holes on both ends of each shell
2:03
You'll want to drill three sets on each end. To make this project a little easier, we're going to make guides
2:09
To do this, we're simply going to cut scrap wood to know where to place each shell
2:13
Two pieces of scrapwood at 4 inches long, two pieces of scrapwood at 14.5 inches long, and 2 pieces at 12.5 inches long
2:22
long. Place your two four-inch guides at the bottom of your side panel. Make sure they're flush with the
2:27
ends of the side panel and use clamps to hold them in place. Attach your first shelf using one and a
2:33
quarter inch pocket hole screws. Now you're ready to place your next shelf. For this shelf, you'll use
2:39
the 14-inch guides. Place your 14-inch guides against the shelf you already attached and there's no
2:45
need to clamp them this time. Add your next shelf and make sure the guides are straight and flush
2:50
against both shelves Using one and a quarter inch pocket hole screws you now have two shelves in place Now you ready to place your middle shelves Using the 12 and a half inch guides and following the same steps as before attach four more shelves
3:05
Now you have five shelves attached. For the last visible shelf, you're going to use the 14 inch guides again, following the same steps
3:13
The last shelf isn't really a shelf, but will be a place to attach our crown molding. We're going to place it at the first
3:20
the top of our side panel, making sure it's flush with the end of the side panel using
3:25
one and a quarter inch pocket hole screws. Now you're ready to attach your other side panel
3:31
This step takes a little bit of muscle or maybe even two people. You're going to lay your
3:35
remaining side panel flat on your workspace. Flip your partially built shelving unit on top
3:42
of this side panel. Make sure it's lined up straight with the side panel. Now you're ready
3:47
to attach all of the shelves to the other side panel following the same steps. Be sure to
3:53
use the guides for straight level shelves. When attaching the back panel, cut it to fit and
3:59
use a bradnailer or nail gun. Now you're ready to add a trim piece to the bottom. Cut a piece
4:05
of plywood to fit below the bottom shelf and in between the side panels. Then you'll use one in a
4:11
quarter inch wood screws from the outside of the side panels. Now we're ready to make the arch
4:17
Cut a piece of plywood to the following dimensions 28 inches by 21 inches Find the center of this piece of plywood which will be 14 inches Mark that spot Draw a faint line down the center of the board
4:34
Measure in one inch from the sides and bottom of the board. Mark it and attach a nail in each
4:42
spot. Decide how far down you want the top of your arch to be. Attach a nail. Attach a nail
4:48
in the center of the board at that measurement. For me, I want about six inches from the top
4:55
Weave your long metal ruler inside the two bottom nails and outside the top nail
5:01
Draw your arch with a pencil. And then use a jigsaw to cut out your arch
5:09
To clean up any of the rough edges, run an orbital sander over the arch
5:14
Use one and a quarter inch wood screws to attach it to it
5:18
to the top of your bookshop. Following the directions on the packaging
5:23
attach edge banding to cover up all of the rough edges. Fill all of your nail holes with wood filler
5:29
and sand the entire piece with a 220 grit sandpaper. And now you're ready to paint your beautiful arched bookshelf
5:38
For a more detailed look at this DIY project, be sure to check out the full tutorial link below
5:44
And don't forget to like and subscribe for more great content. Thank you