

After spray painting my bathroom countertops, I felt inspired to take things up a notch. I started researching marble countertops but quickly realized how pricey they can be.
Thankfully, during my search, I stumbled across the Giani Marble Countertop Paint Kit—the perfect solution for DIY marble countertops without the hefty price tag. I decided to give it a try, and my countertops went from this…

Before I spray painted them…

To this… (after I spray painted them a solid white color)…
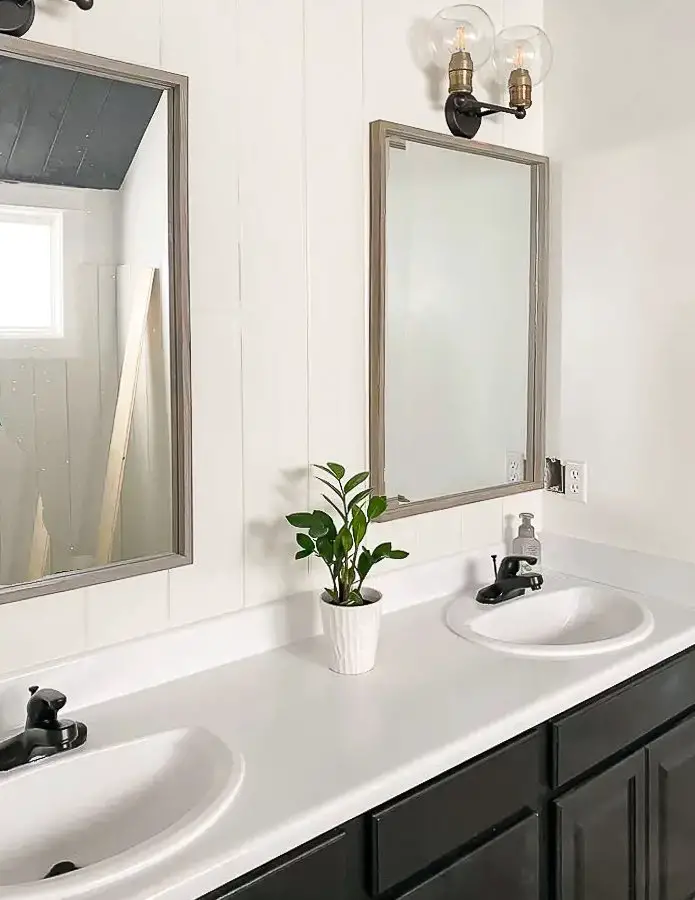
To finally this look. A beautiful marble countertop finish…

Isn’t that incredible? And the best part? It was simple and budget-friendly. Everything I needed was right there in the kit.
Let me walk you through the process so you can achieve the same stunning transformation. Plus, I’ll share a few tips on how I wind down after a busy DIY day!
My Skincare Routine After a Full Day of DIY
After spending hours perfecting my marble countertops, I love to unwind and take care of my skin. It’s the perfect way to relax and reward myself for a job well done. At night, I use Maelove’s Night Renewer, which works wonders for smoothing and renewing my skin overnight (you can check it out here). And for my morning routine, Glow Maker is my go-to for a bright and radiant start to the day (find it here).

Now, let’s dive into the steps for transforming your countertops!
How to Paint Marble Countertops
Transforming your kitchen with beautiful faux marble countertops is easier than you might think. With the right tools and a little patience, you can achieve a professional look without the hefty price tag of real marble.
The best part? The Giani Marble Countertop Paint Kit has everything you need to complete this DIY project from start to finish.
Amazon Affiliate Links Included
Everything You Need In One Convenient Kit
One of the best things about the Giani Marble Countertop Paint Kit is that it includes everything you need to get the job done—no extra trips to the store required!
The kit comes with a primer, veining paint, an epoxy resin topcoat, brushes, a foam roller, a spray bottle, and even practice materials to perfect your technique.
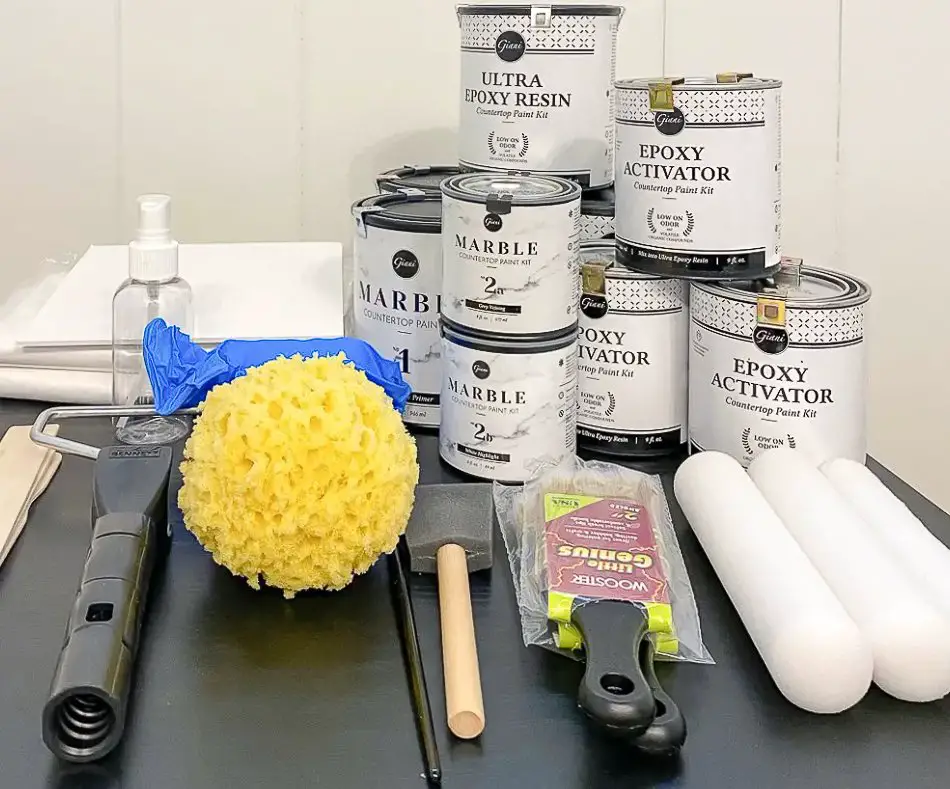
Giani has thought of everything, making this DIY project accessible even for beginners. With all the supplies in one package, you can confidently transform your countertops into a stunning faux marble finish without hunting down multiple products.
Everything Included:
- 32 oz. Marble White Primer
- 6 oz. Grey Veining Mineral
- 3 oz. White Highlight Mineral
- (3x) 9 oz. Epoxy Activator
- (3x) 18 oz. Epoxy Resin
- 6″ Giani Roller Arm & 1 Standard Roller Pad
- (2x) Foam Roller Pads for Epoxy Application
- (2x) 2″ Brush
- 4″ Giani Paint Sponge
- 2″ Foam Brush
- Artist Brush
- Misting Bottle
- Practice Board
- (3x) Wooden Stir Sticks
- Nitrile Gloves
- (2x) 9’x12′ Plastic Dropcloth
- Step-By-Step Instructions
Step One: Prep & Tape Off
First things first—clean your countertops thoroughly. Make sure every bit of dust and debris is gone.
Use a damp cloth or tack cloth for the best results. Then, use painter’s tape to tape off any areas you don’t want the paint or epoxy resin to touch, like the backsplash or cabinets.
Tip: It’s important to protect your cabinets and flooring from accidental drips or splashes. Cover your cabinets and nearby surfaces with plastic drop cloths or plastic sheeting, securing it with painter’s tape. This extra step ensures you don’t end up with any unwanted mess or damage during the project. You’ll be grateful for the protection, especially when you start working with the epoxy later on!
Step Two: Apply the Primer
Next, it’s time for the white base coat.
- Using the foam roller provided, start by edging any corners or creases with the small brush.
- Then roll on the base coat evenly over the entire surface, making sure all strokes go in the same direction.
- Let the first coat of primer dry for at least 4 hours before applying a second coat.
- Remember to work in small sections—this gives you better control and smoother coverage.

Step Three: Plan Your Veining
Before you jump into the veining, it helps to plan ahead. While my primer was drying, I practiced drawing out the veining on a piece of cardboard.
Sketch out your countertop surface on a piece of paper or cardboard to visualize where you want your veins to go.

You can Google images of real marble countertops or even pick up a small piece of marble tile from your local hardware store for inspiration.
Make sure all your veins flow in the same direction for a natural stone look. This doesn’t need to be perfect—just a rough guide will do!

Step Four: Create the Veins
Once you’re ready, dip a little bit of gray paint onto a small paintbrush and loosely pull the brush across the countertop. Let the brush flow naturally, avoiding straight lines for that authentic marble veining look.
Don’t worry if it’s not perfect; this is where the magic happens.

Now, grab the spray bottle filled with water and mist the vein lightly until the paint starts to soften.
Use a small, clean paintbrush or even a paper towel to gently dab the paint, creating a feathering effect. You can even blot the vein to soften it more.
If you’re unhappy with how it looks, simply spray more water and wipe it off with a paper towel to start over.

There are several veining styles you can try:
Y-Vein: Start with one vein, then branch off with another.
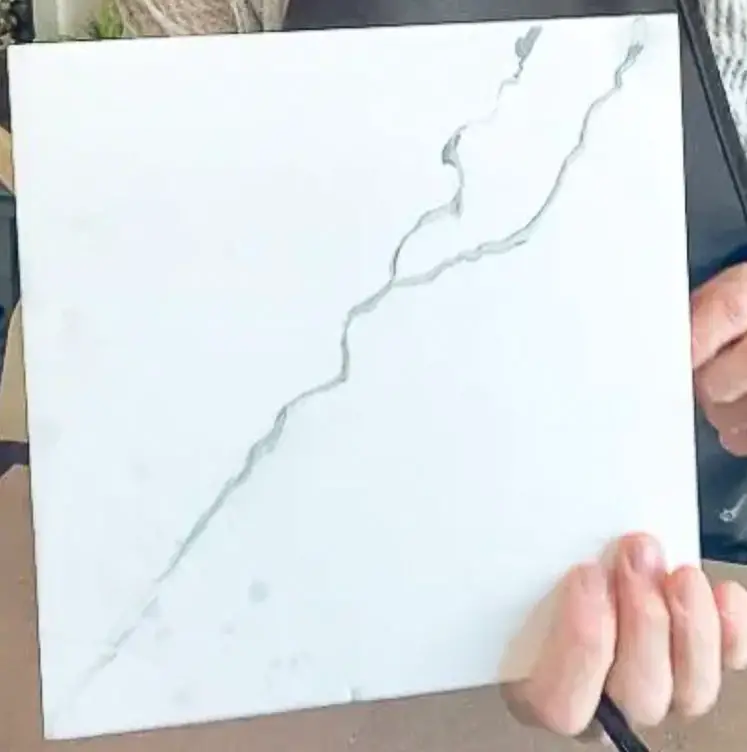
Extended Vein: Create long veins, working in sections.
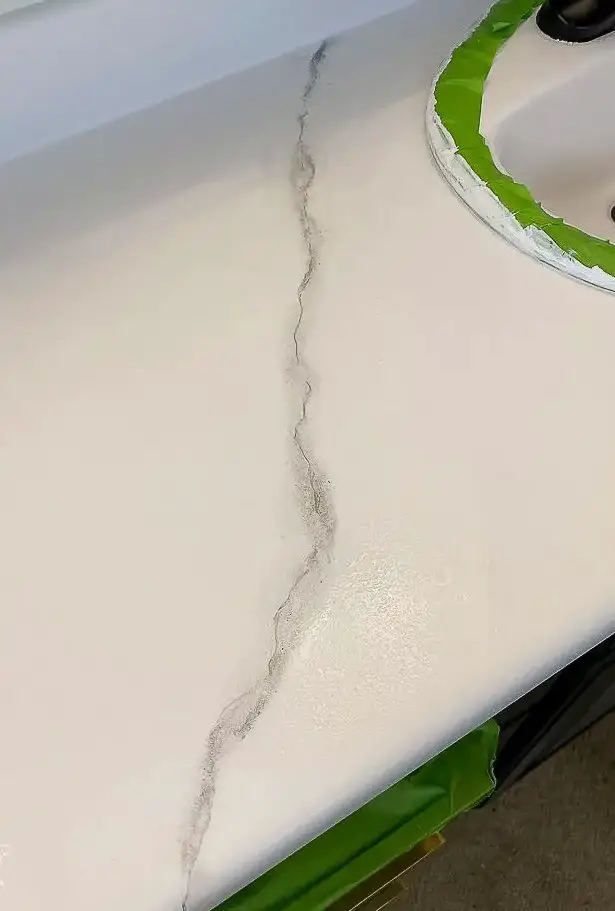
Crescent Vein: Paint curved veins that mirror each other.

Ripple Vein: Paint parallel veins that mimic natural stone ripples.

Once your veining is done, step back to assess the overall look. You can add lighter or smaller veins (often called “ghost veins”) for a more intricate design.
Adding Texture and Softening Veins for a Natural Look
If you feel like your veining needs a bit more depth or softness, don’t worry—this step is easy to adjust.
Using the white highlight paint included in the kit, grab a small sponge and lightly dab it onto your veins. This will help add texture and soften any harsh lines, giving your faux marble a more natural, blended look.
The key here is to work lightly and build up gradually until you achieve the desired effect. It’s all about personal preference, so feel free to experiment until you’re happy with the result!

Step Five: Seal with Epoxy
Now for the final step: epoxy! Before starting, be sure to wait at least 4 hours after finishing the veining and any additional highlights to ensure everything is fully dry.
Once that time has passed, start by sanding the entire surface with 600-grit sandpaper to smooth out any imperfections. Wipe away all the dust with a damp cloth. If you haven’t already done so, cover your cabinets with plastic sheeting to protect them from epoxy drips.

Following the epoxy kit’s detailed instructions, pour the epoxy resin in small 6-foot sections and spread it with a foam roller and small brush. This epoxy has self-leveling properties, so be sure to let it do its thing.
Don’t worry if you see air bubbles—just leave them alone. I made the mistake of trying to fix them, which only caused more trouble. Let the epoxy dry for about 4 hours after application for a smooth, glossy finish!
Pro Tip: Resist the urge to touch or mess with the epoxy while it’s drying. Trust me, it’s best to let it be!
The Final Look
And there you have it—beautiful faux marble countertops that will make a statement in your kitchen or bathroom! You’ll never believe how realistic they look until you see them in person.
It’s a budget-friendly way to give your countertops a high-end look, and the best part is that it’s a DIY project you can tackle with just a little bit of patience.

If marble isn’t your thing, Giani has some other amazing options that can still give your kitchen or bathroom a stunning, high-end look. Two of my favorites are the Belgotta Black Marble and White Glass countertop paint kits.
The Belgotta Black Marble kit offers a bold, sophisticated finish that mimics the look of real black marble with striking white veining.
It’s perfect if you’re going for a more dramatic, modern feel in your kitchen or bathroom. The deep black finish adds a sleek, luxurious vibe to any space, and it pairs beautifully with stainless steel appliances or crisp white cabinetry.
Amazon Affiliate Links Included

On the other hand, the White Glass kit provides a clean and contemporary look with a soft, translucent finish. It’s a perfect choice if you’re aiming for an airy, minimalist style.
The glossy white surface reflects light, making the room feel brighter and more spacious. This kit works especially well in smaller kitchens or bathrooms where you want to create the illusion of more space while keeping things fresh and elegant.

Both kits are just as easy to apply as the marble finish, giving you the flexibility to choose a style that fits your aesthetic, whether you’re going for modern elegance or sleek sophistication!
One countertop paint kit I’m excited to try is Giani’s new Venetian Gold. This finish offers a warm, rich look with beautiful gold and brown tones, mimicking the elegance of natural granite.
It would be a stunning addition to a kitchen with earthy, neutral tones or a bathroom looking for a touch of luxury.
Amazon Affiliate Links Included

A Few Extra Tips:
- Use plastic drop cloths and painter’s tape to protect your cabinets and floors.
- For best results, work slowly and in small sections.
- You can apply a second coat of primer if needed to ensure full coverage.
- Be sure to practice your veining on cardboard first to get the hang of it.
- Avoid using darker gray paints unless you want a bolder, more dramatic look.
This entire process is a great choice for DIY enthusiasts looking for an easy way to transform ugly countertops into a stunning focal point in your kitchen.
No matter what your countertop base is…laminate, granite, or butcher block, to name a few, the Giani kit works on a variety of surfaces. With just a little bit of effort, you’ll have a whole new look!
Painting your own countertop might seem intimidating, but with the right tools and detailed instructions, it’s a surprisingly simple way to update your space.
The Giani Marble Countertop Paint Kit is an affordable option to get the look of real marble countertops without breaking the bank. If you’re interested in DIY marble countertops, this kit makes it easy to achieve a beautiful, high-end finish.
So, if you’re ready for a fresh, new look, grab your kit and get started today!
Designer Tip: When It Might Be Time to Bring in Help
If you’re working on your home and things still don’t feel quite right, you’re not alone. Many of our clients start exactly where you are now. They’ve gathered ideas, saved inspiration photos, and maybe even purchased a few pieces, but the space still doesn’t feel cohesive. That’s often the moment when having a designer can make all the difference. We help homeowners create a clear plan so every decision works together. From layout and furniture placement to finishes and lighting, the goal is a space that feels thoughtful, comfortable, and complete.
If you’d like a little guidance with your space, you can learn more about our interior design services below.
Explore Interior Design Services
Planning a kitchen, living room, or full home project? Start with a quick discovery call to see if we’re a good fit.
Let’s go beyond the design to build something beautiful together!
More Great DIY Tutorials:
Easy Textured Wall Art DIY with the Most Creamiest Paste
Easy How to DIY Textured Canvas Wall Art


0 Comments